The Great Garthim Cosplay Build!
- Kate Daley

- Nov 6, 2020
- 11 min read
Updated: Nov 8, 2020

Wow. WOW. When I shared the pics from my Garthim photoshoot on social media I was obviously hoping for a positive reaction. However, I was NOT expecting the deluge of wonderful messages I received. Since last Saturday (Oct 31st) the photos have been viewed well over 12,000 times (!!!) and over 4,000 people have taken the time to add a like, love, or leave a comment. I am overwhelmed!
SO many people have been interested in some sort of tutorial or build log I've decided to write this blog with subsequent behind the scenes material. Although I have already released a “build” video on YouTube (see below), due to various circumstances that got edited down to more of a history behind the build with video and pics from the photoshoot. This blog, I hope, will help fill in those gaps.
To make a long story short, I was originally building this for Costume Con 38 in Montreal in March of this year. That con was cancelled due to Covid 19, so I shelved the costume. 6 months later I booked a photoshoot in October in order to force myself finish it, which we did...just. Here now is a breakdown, from start to finish, of the entire build.
Part 1) And I shall call her Mini-Me...
I started things out by taking all my measurements as well as a few photos of me in my underwear (NO, I'M NOT SHARING THOSE). This was so I could needle-felt a mini-body double of myself from polyester batting, over a wire and dowel armature.
I then carefully marked all the scaled down measurements with coloured yarn, and felted those in place. Then I attached her to a base.
With my “mini-me” complete I started drafting the pattern pieces – first from scrap paper and then from craft foam (along with wire and straws to stand in for PVC pipes). The idea was to get as precise a model of the finished costume as I could. When I finalized the pieces I cut them from heavy card stock.


At the same time I was running some material tests. I had a box of about a dozen Jumbo sheets of Black Worbla I'd been gifted a few years ago so I intended to use that for most of the costume (plus, in theory it meant less priming because it was already black).
We also had some excess 1/2 inch thick L200 foam stock in the shop that we donated to the cause. I had dabbled with L200 a bit but I wasn't as familiar with it as EVA foam so I wanted to experiment first.
One MAJOR thing to be aware of if you've never used L200 before. It EXPANDS with heat – it doesn't shrink like EVA does. In fact it puffs up and gets very soft, almost like marshmallow, when it is hot. This made it pretty easy to shape, and it has a fair amount of stretch while hot, but it also meant it was vulnerable to tearing until it cooled down.
Now... I have always found Black Worbla to be less sticky than regular Worbla (Finest Art). If I have a choice and I'm laying out Worbla over foam, then I generally reach for Finest Art. However, due to the volume of Worbla we were going to need, I was stuck with the black.
However it ended up having a really interesting effect! The fact L200 expands with heat along with Black Worbla not being super sticky ended up causing a LOT of air bubbles between the two layers. Now normally of course, this would be a pain to correct, but here it was exactly the effect I was looking for! It created the bumpy texture of the Garthim shell perfectly. And where there were particularly large bumps I was able to form those by hand with the L200.


Part 2) Make My Monster Grow!
With my material tests successful and my pattern blocked out on Mini-Me, it was time to scale things up to life-size.
I had a Mini-Me but next I was going to need Another-Me. Panda Partner and I made a classic duct tape dummy although while he was wrapping me in tape I made sure to be in a slightly doubled over pose with my knees slightly bent (holding on to the backs of two chairs helped immensely). We wrapped my hands separately and attached those after. I wore an old hoody and a paper full face mask so that Panda could get a rough head shape on the dummy.
We had a few old containers of well aged Foam-It 5 (and one of Foam-It 8) kicking around so our plan was to use that to fill the dummy with. Now, Foam-It expands fast and we weren't sure how much it was going to expand since this was very old material (we did do a test to make sure it was even viable first). So we divided the duct tape “skin” into sections, taped the seams closed, and filled them piece by piece.
We started with the feet, then the legs, followed by the arms, then the torso. We ran out of Foam-It for the top of the shoulders and the head so we resorted to polyester stuffing for those.


The next step was to scale up the pattern pieces. For this I used a pantograph which is an old fashioned device for scaling up or scaling down drawings in the days before scanners and printers. Essentially a pantograph is four criss-crossing bars with a stylus at one cross-section, a pencil at another, and two split pins at the remaining two. Depending on where you cross the bars, and place the different components, you can trace a picture with the stylus and the pencil will draw either an exact duplicate, or a larger or smaller version.
Using a pantograph takes a little practice though. You have to figure out the best spot to put your pattern so that you can trace around it with the stylus without the pencil end running off the paper or the table (because the pencil end may stretch quite a ways from your origin point and at an angle you do not expect. You also want to be able to trace around in one, unbroken movement, or if you absolutely have to stop, then stop at a very distinctive point, because if you pick up the stylus and put it back down in a different spot the pencil may not line up right automatically at the other end. This is the main reason I like to transfer all my small pattern pieces to card stock – it gives me a bit of a lip to trace around. I also found I had to strap weights to the pencil end to make sure it always made contact with the paper and didn't skip.
When you first trace around a piece the line looks really weird and wrong. Basically every tiny jiggle at the stylus end gets magnified and looks really wobbly on the large version. But if you go back and clean up your lines on the large version it is actually pretty accurate.
I made a test copy of the leg assembly in foam core, to make sure I had the scale right and so forth, before I went through all the trouble of tracing all the pieces.
I wouldn't use a pantograph to copy a very intricate drawing or design directly onto your finished material, but for tracing pattern pieces it works very well!
After the successful test, I used the pantograph to scale the rest of the pattern pieces onto super big sheets of bristol board, cleaned up the edges and any mistakes. Then once those were cut out I traced the patterns onto the L200 with a black sharpie.


Part 3) Our Shaping Begins....
Now with finger files, and my Dremel with a sanding drum, Panda Partner and I started shaping the foam pieces. Some of the sheets just needed the edges rounded a little, others, like the plastron (belly plate) needed grooves incised in them.
I did this with a handy “V” shaped finger file. It was OK that the groove was not 100% clean.
For the pieces that needed more shaping, like the plastron and shoulder pieces, after cutting the grooves, I heated the L200 on both sides with a heat gun, and then gently pushed and shaped the foam from the back side to round out the front.
The shoulders, plastron, and sides (not shown – they didn't get done till almost the very end) we kept as just foam. After shaping they got 2 coats of Flexbond primer and then 2 coats of black India ink.
I actually did a test on a scrap piece of L200 to see if the Flexbond was necessary. The two pieces looked identical until they started being flexed. Then the ink-only piece developed all sorts of cracks in the colouring and immediately started to flake. The Flexbond covered piece was super durable.
The idea was all the plates were going to attach to a PVC frame that would strap to my back. I came up with the initial shape but mainly left construction of the rig to Panda's expertise. He's good at the structural stuff.


Part 4) Whipping out the Worbla...
I'll tell you right now – Worbla-ing 7 massive plates and a dozen smaller pieces of giant alien crustacean at midnight is NOT fun (this was still back in March when we were working frantically to finish for Costume Con).
The first step was to thoroughly protect the table top. The workshop floor was just too messy and dusty to work on so we covered the table with some old foam core covered in aluminum tape sheets, and then with all the silicone mats we had. We positioned the silicone mats along the edge of the pieces where we knew there was potential to be heating the work surface as well as the piece.
I don't have any further pics of this step as we were really down to crunch time. Plus it took both of us to heat the Worbla/wrap and shape the shell pieces so there really wasn't time to stop and take a pic.
The procedure went thus: we'd put the Worbla on the table and place the shell piece top down on the Worbla. With chalk we traced around the shell plate. Then we removed the shell plate and cut away the excess Worbla, leaving 3-4 inches of Worbla all around to wrap around to the backside of the plate.
With both of us working at once with 2 heat guns (on two different circuits I might add) we heated the whole sheet of Worbla. Then we lined up the foam plate with the chalk and stuck the piece down. We then went a bit at a time along the edge of the Worbla, heating it enough that we could fold it over the edge of the foam and secure it to the back.
Once the edges were wrapped around we flipped the plate over so it was now Worbla side up. This was the texturing phase. Panda continued heating the surface until air bubbles started to form while I (with heat gloves on) poked the surface to make sure the bubbles stayed relatively small and evenly spread.
While the sheets were still warm we did a rough shaping over the frame/dummy.


All the many small legs were created with foam pipe insulation. We found 3 different sizes, at the hardware store, which all fit nicely into each other.
After cutting each section to size they were roughed up by whittling them/shaving them down with a box cutter.
Then we shrank/heat sealed them with a heat gun. This bit had to be done very carefully – too much heat and the foam shrivelled away to almost nothing.


Part 5) After ... well during... the plague
At this point lockdown hit. Between a new family obligation and increased strain on our mental health, everything got put on hold for about 6 months. When we picked up again, in early September, the biggest challenge was the leg assemblies.
The leg assemblies hold all the small legs and were meant to attach just above my knees in order to hide my real legs.
The L200 and Black Worbla combo was just NOT working for the leg assemblies. They kept falling apart.
The solution ended up being to secure everything as much as possible, then cover the assemblies in expanding foam, then apply more Black Worbla over top. This was MUCH better – everything felt far more secure.


Beneath the leg assemblies, my legs were further hidden by the most stylish pants evar! We took a ball of jute cord, unwound the strands, and glued small sections all over a pair of pants. This created a fuzzy mass which hid the shapes of my legs beneath the spindly Garthim legs.
The hands, arms, plastron, shoulders, and helmet were pretty much ready for their final paint job. If all we had left to finish were the legs things would have been relatively easy.
However the back plates were not nearly as ready to go as we had hoped. They all required more shaping which was hard to do with such large pieces. Again Panda had to heat while I shaped.
Although we had originally cut a groove around all the edge of the back plates this didn't create enough of an edge to match the reference photos. Each plate also had a large ridge down the middle of each back plate. Things just didn't look right without them.
So we took all the Black Worbla scraps, chopped them into small pieces and heated them in our workshop oven. I then formed these into logs, rolled these out into smaller “sausages” and then attached them a little at a time along the edge of the plates. I blended the sausages in with a silicone tipped sculpting tool.
This really helped bring things together but it was very time consuming. At this point I had booked the photoshoot so we had limited time left to finish the costume.
Reheating the plates to attach the edging ended up warping a few of them so we had to make adjustments again.
I was also starting to realize to my dismay that the PVC rig was actually too big. The shape was correct but it sat too far off the back. Panda had to shorten it.
To attach the plates to the rig Panda actually attached D-rings to the underside of each plate. These hook onto a series of nuts and washers attached to the PVC.


We were still worried about 1 thing. We hadn't figured out a way to attach Plate 2 and Plate 1 (the plate that sat over the shoulders and head). Plates 7-3 hooked onto the rig but we hadn't made any decisions about how to attach 1 and 2.
Even after adding the ridges, and re-adjusting the plates we were still at loose ends.
We were looking at some major last minute changes and contemplating hacking a huge chunk off Plate 3. Instead we tried sliding the hooks on the rig down. Then suddenly everything fit!
Part 6) The Home Stretch
With the plates finally in the right place, the last major piece missing were the sides. These were more L200 textured with a heat want tool then coated in Flexbond and India ink.
After that the remaining steps were cosmetic. Tiny arms were made in a very similar manner to the legs. I carved them from lengths of pipe insulation, heat sealed, then primed with Flexbond and ink the same way the legs were.
Everything needed to be painted. To create an iridescent look I airbrushed a light layer of uneven bronze india ink over the black ink base coat, followed by uneven coats of magenta and green ink. I finished with a very light, uneven coat of more black ink.
The fuzz or hair between the arm plates was created with crepe wool. The braids were unwound and then straightened with a straightening iron. They were stuck to lengths of tape which were then hot glued inside the shell. To speed up time (because at this point we were only a few hours from the shoot) the side fringe was done with loose wig hair. Again, it was stuck to strips of duct tape and glued in sections under the plates.
We had completed everything with a whole 1.5 HOURS left before the photoshoot, which meant that we had no opportunity to attempt a dress rehearsal. The first time that I put on the ENTIRE costume was in the woods during the photoshoot.
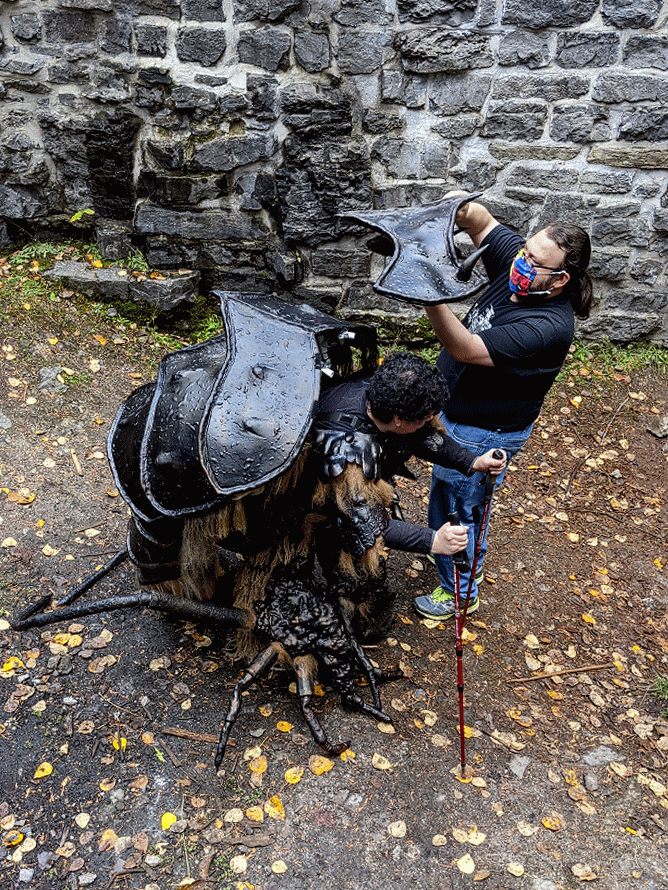
Oh my goodness it was HEAVY. But in the end I couldn't be happier with the result. It brought back all the great feelings and reminded me why I became a cosplayer in the first place.


We'd like to extend our sincerest thanks to: Cole Lewis of Cole Lewis Photography for the photos (https://www.facebook.com/colelewispho...)
Matt Ficner of Matt Ficner Productions/Unusual Customs for taking video of me at the ruins (http://mfproductions.ca/index.html) (https://www.etsy.com/ca/shop/UnusualC...)
"Blood For The Cosplay Gods" t-shirt from Geek Charming Apparel (https://geekcharming.ca/)


Comments